

Post by Deleted on Feb 26, 2012 14:37:17 GMT -6
So I've been trying to figure out the best pattern to tie for spring pike fishing. I was getting frustrated trying to get a big profile pattern that isn't heavy! I'd seen so many great patterns on the internet but never could figure out how they did it!
I stumbled upon a European pike fly tyer who had a tutorial on how to create "hollow" pike flies. These are light but push a lot of water, due to their big profile! He explained it really well and once I saw how it was done and it all made sense!
So here's my tutorial on how to tie a basic BIG pike fly that combines being lightweight, durable, has a large profile and won't tear your head off when casting!
Hollow Pike Fly
Hook: Partridge CS43 Absolute Pike Hook 4/0
Thread: Black Kevlar 3/0
Tail: UV Pearl Krystal Flash and White Bucktail
Overwing: Black Synthetic Big Fly Hair, Black Icelandic Sheep's hair, Silver Krystal Flash, Silver Flashabou
Underwing: White Synthetic Big Fly Hair, White Icelandic Sheep's hair, UV Pearl Krystal Flash
Step one, get your thread wrapped on good. Kevlar thread has a tendency to slip on the hook shank so it's a good idea to half hitch (single whip finish) often and apply head cement or super glue on your wraps as often as you can.
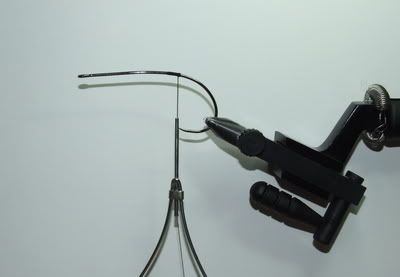
Start by tying in your flash tail. The length is up to you. Mine was about 5-6 inches
Next tie in a clump of white bucktail over top of the flash. I like to make sure the bucktail wraps 360º around the hook shank and totally contain the flash.
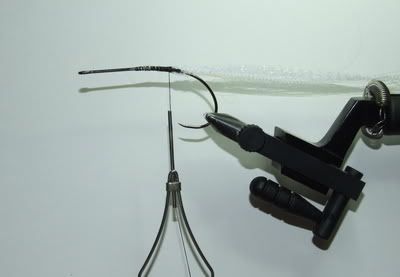
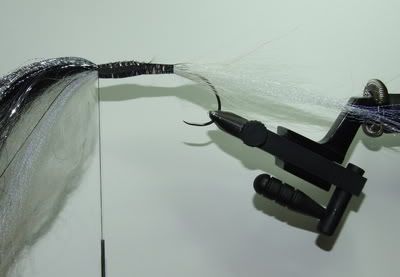
Now you can wrap forward and start tying in your wing materials. BUT, instead of the standard rear-facing wing, you want to tie everything forward. Make sure you make it all long enough to fold back and create enough of a wing. Remember that whatever you tie in first, will be the outer-most part of the wing. So darker, more durable materials first, and work in towards flash and accent colours.
Almost ready to fold back. This photo shows all the materials tied forward. You'll notice I tie a fair amount onto the hook shank and it's important to coat with epoxy or head cement before you continue. Also, make sure you whip finish often!
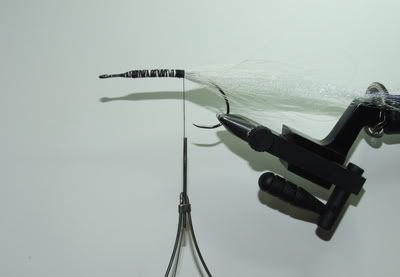
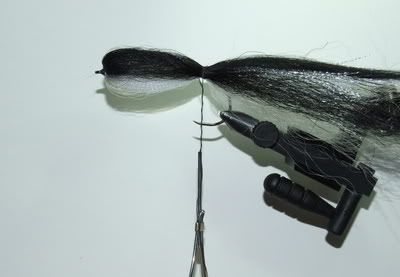
Now you want to separate the top and the bottom wings and fold back. I like to hold it down with my left hand and bring your bobbin ahead of the wings right behind the hook eye. Wrap a small head here and tighten up the wings. You don't want to tie over the wings though. Whip finish and cut your thread.
Now take your bobbin and wrap over the folded back wings and push them forward to create a "bubble" like shown in the photo. This is giving the shape for the head.
Epoxy around the hook eye and make a 1/2" head of epoxy. This will hold the materials at the desired angle. I like to use a two-part, liquid epoxy instead of the gel type. This way I know it's penetrating through the materials and into the thread. You can also use Marine Goop or UV epoxies. You can add your eyes at this time as well. I like to epoxy over the eyes and make sure they won't fall off when you catch a fish.
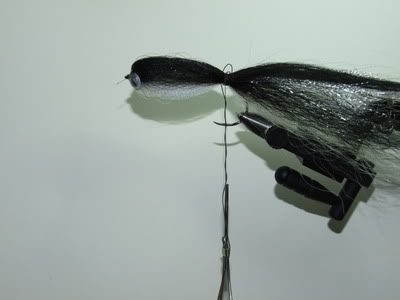
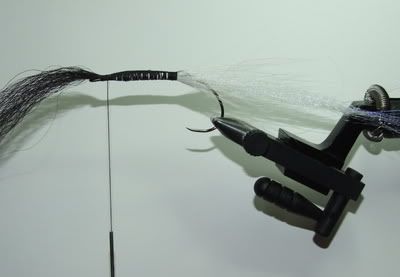
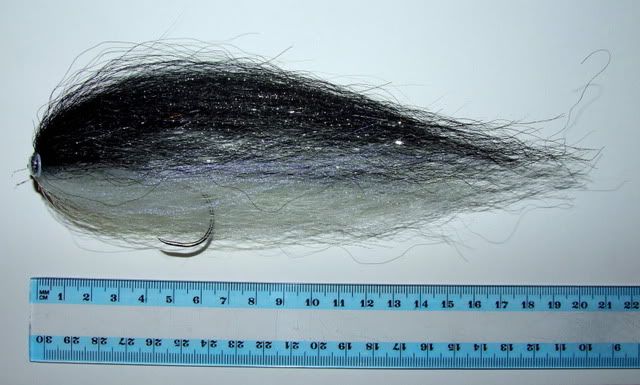
When the epoxy is dry you can unwrap your bobbin and the wing will stay at this angle. You will be left with a large profile, "hollow" fly. This fly is 8-inches long but doesn't weigh much. Also because I used a lot of lightweight materials that don't absorb water, it will easier to cast than say a big bunny strip style fly.
weedbed.blog.com/2012/02/pike-fly-tutorial/
Nick
I stumbled upon a European pike fly tyer who had a tutorial on how to create "hollow" pike flies. These are light but push a lot of water, due to their big profile! He explained it really well and once I saw how it was done and it all made sense!
So here's my tutorial on how to tie a basic BIG pike fly that combines being lightweight, durable, has a large profile and won't tear your head off when casting!
Hollow Pike Fly
Hook: Partridge CS43 Absolute Pike Hook 4/0
Thread: Black Kevlar 3/0
Tail: UV Pearl Krystal Flash and White Bucktail
Overwing: Black Synthetic Big Fly Hair, Black Icelandic Sheep's hair, Silver Krystal Flash, Silver Flashabou
Underwing: White Synthetic Big Fly Hair, White Icelandic Sheep's hair, UV Pearl Krystal Flash
Step one, get your thread wrapped on good. Kevlar thread has a tendency to slip on the hook shank so it's a good idea to half hitch (single whip finish) often and apply head cement or super glue on your wraps as often as you can.
Start by tying in your flash tail. The length is up to you. Mine was about 5-6 inches
Next tie in a clump of white bucktail over top of the flash. I like to make sure the bucktail wraps 360º around the hook shank and totally contain the flash.
Now you can wrap forward and start tying in your wing materials. BUT, instead of the standard rear-facing wing, you want to tie everything forward. Make sure you make it all long enough to fold back and create enough of a wing. Remember that whatever you tie in first, will be the outer-most part of the wing. So darker, more durable materials first, and work in towards flash and accent colours.
Almost ready to fold back. This photo shows all the materials tied forward. You'll notice I tie a fair amount onto the hook shank and it's important to coat with epoxy or head cement before you continue. Also, make sure you whip finish often!
Now you want to separate the top and the bottom wings and fold back. I like to hold it down with my left hand and bring your bobbin ahead of the wings right behind the hook eye. Wrap a small head here and tighten up the wings. You don't want to tie over the wings though. Whip finish and cut your thread.
Now take your bobbin and wrap over the folded back wings and push them forward to create a "bubble" like shown in the photo. This is giving the shape for the head.
Epoxy around the hook eye and make a 1/2" head of epoxy. This will hold the materials at the desired angle. I like to use a two-part, liquid epoxy instead of the gel type. This way I know it's penetrating through the materials and into the thread. You can also use Marine Goop or UV epoxies. You can add your eyes at this time as well. I like to epoxy over the eyes and make sure they won't fall off when you catch a fish.
When the epoxy is dry you can unwrap your bobbin and the wing will stay at this angle. You will be left with a large profile, "hollow" fly. This fly is 8-inches long but doesn't weigh much. Also because I used a lot of lightweight materials that don't absorb water, it will easier to cast than say a big bunny strip style fly.
weedbed.blog.com/2012/02/pike-fly-tutorial/
Nick


