|
|
Post by kilgortrout on Mar 6, 2012 21:45:52 GMT -6
So what is needed now is to get the reelseat spacer and grip to fit on to the blank. Some old fashioned sitting down with a rat tail file and some good tunes and making dust until it fits.   I think the color and shape of the grip is looking mighty fine for this Bamboo. I may be biased since I am making it, but long as I am happy the rod should get finished. I have not glued anything on yet but just fitting it out. Cheers Ron. |
|
|
|
Post by kilgortrout on Mar 8, 2012 22:26:13 GMT -6
I have the grip and reel seat glued on to the blank, one quick check to see that things are lined up. Unlike a graphite it is a little more tricky to remove something once the epoxy is set. I checked the spine/spline and a check to make sure things line up so the guides can go one a flat of the blank. Mostly getting the reel seat perfect with the right flat. Let the epoxy harden to just beyond thick syrup and have one final check. That final check has saved me a lot of grief in the past, a brain fart or just some creep while things sit who knows. Next step is collecting up the components which puts me will into comfie territory of rod building thinking it is down hill form here and little can go wrong from here.  I am not a snake guide fan and will go with single foot guides, I think it will still look Bamboo. Traditionalist cringe at single foot guides, but I am if the thinking that I want the best of both worlds, the power and custom taper of the Bamboo world and the best components the modern world can offer. I will compromise with a agate stripper. Ideally I would go with a bigger stripper say a 12, the agate is a 10 so not all that far off the mark. Also tradition dictated one guide per foot of rod plus one more, I will go with 3 more. This rule is even more deeply written in stone right on up to the top makers. I am amazed that the idea is Poo Pooed and very closed minded across the board when this topic is raised. So if you want a rod that shoots line like you are Lefty Kreh then add 3 or more guides onto your rod next time you build one. The nay sayers contend it will just add rod damping/killing weight to the rod. The thing with a fly line is it sags between the guides and this sag increases friction and kills the lines ability to shoot. If I use thin wire single foot guides as opposed to snakes I have less wire, half as many wraps/epoxy and weight to spare for three extra guides. So it is all good. With This Bamboo taper that will bend well down into the rod it will cast like a rocket and shoot line like lightening, defiantly not the thinking of the fast tip thinking crowd, but hey build them how you like them. Cheers Ron. |
|
|
|
Post by kilgortrout on Mar 18, 2012 21:12:27 GMT -6
Before I get the guides on I put on a winding check. I cut it off the end of the reel seat spacer. I made the spacer a bit long so it could be trimmed down. so instead of just cutting off the end I rounded it over and then cut it off leaving the spacer cut to length I put the spacer on before the guides, as it does not go on after the guides are on, something I have learned the hard way in the past.This spacer helps to fit something round onto something hex shaped, and keeps the water from going into the grip. The rod tapers rapidly just a few inches in front of the grip so on this few inches I will put on a few green dyed grizzly hackles. I picked out six that are about the same. The green should go well with the green and purple wraps.  You can see the blank is still not finished yet, but a little glue line around the winding check to ensure that it is sealed, this will blend in when the rod and check is finished. I put the feathers on with color persevere. let it dry and added another coat just to smooth things over.  Cheers Ron. |
|
|
|
Post by kilgortrout on Mar 18, 2012 21:30:53 GMT -6
The guide placement is much the same as I do all my fly rods. The stripper is about a inch ahead of where I can touch the rod with my left hand while holding the rod in my right hand. with my right hand forearm parellel to the ground.
The guide just behind the tip top is 4 inches back from the tip top.
The rest of the guides are placed on the blank according to the bend of the rod. I took some photos but it was to dark and turned out blurry trying to hold the camera and the rod, the Boo Gnome was unavailable.
I will describe it best I can and if it makes no sense, just suffice to say I spaced them out.
I placed the blank on the workbench, with just the cork on the bench top, clamped it down. I bent the tip top down 1/3rd the length of the rod, by putting pennies in a bag and attaching it to the tip top with a paper clip. So a 96" rod (8') divided by 3 is 32", I want to put 12 guides on this rod so in 32' that is a guide every 2.666 inches. I mark this spacing on a stick and move it along the bent rod and put little pieces of tape on the rod where the marks line up to the bent rod. The idea is that where the rod bends most the guides are closer together. Hope this makes sense.
Cheers Ron
|
|
|
|
Post by kilgortrout on Mar 18, 2012 21:35:55 GMT -6
With the guides marked out I can start the wraps, here is the feathers with some green wraps to finish them off.  |
|
|
|
Post by kilgortrout on Mar 19, 2012 12:34:02 GMT -6
Moving on up the blank a bit this is the stripper guide. I put some trim wraps above the feathers to frame the writing of the rod taper and such. I have not used silk thread for this rod, this is size A nylon Gudebrod thread. You can see the green agate stripper insert in the guide. The blank is looking good no glue lines nice color, it will get a bit darker with finish on it. I will put color preserver on the wraps so the thread color will not darken. The wraps are not really Boo traditional but back their somewhere in the past to give it a more traditional flavor anyways. I think I am on the home stretch here and should be done in good time for ice out which is coming at lighting speed here this year.  |
|
|
|
Post by kilgortrout on Mar 20, 2012 9:05:17 GMT -6
With the guides wrapped the last step is to do the inscription is on the rod, the Boo Gnome had the honors of doing the pen work. Then I taped off the ferrules with masking tape, hung the tip and Butt section over two yogurt containers. I diluted spar varnish with alcohol to thin it right out. This varnish is sucked up in a syringe/turkey baster/eye dropper. Starting at the top of the rod the thinned varnish is run down one of the flats of the rod. Once the varnish is dripping into the yogurt container the flat is done. I them moved to the next flat until they were all done. The thinned varnish covers the wraps and the bamboo all at one go, and dried quite fast so no dust settles on it, hopefully.    Here is the Boo Gnome checking the rod for complete coverage and bubbles, good quality control is important.  Two coats of finish and the rod is done, I inverted the tip for the second coat, I was told this made for a better tip. Nothing left to do except let the finish dry and consider it a DONE. I guess some casting would be part of the job but at this point little can be change as the rod is built. Thanks to the Boo Gnome for quality control, company and a third hand for the tricky parts. I think she is the most knowledgeable 8 year old Bamboo rod maker in the city but I might be biased. It was great fun making this rod and this was enhanced by sharing it with the forum. Now that the snow is gone it is on to fishing. I will post some photos of the finished rod. Cheers Ron. |
|
|
|
Post by brucerap on Mar 20, 2012 17:04:23 GMT -6
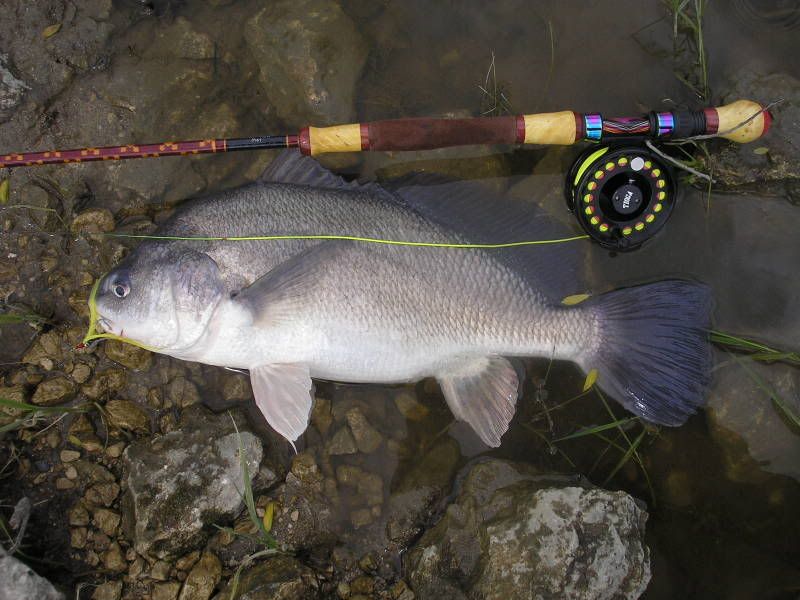
Beautiful work, Ron. I look forward to seeing the pic of the first fish caught on it.
|
|
|
|
Post by kilgortrout on Mar 21, 2012 20:19:14 GMT -6
|
|
|
|
Post by brucerap on Mar 22, 2012 5:40:50 GMT -6
Looks real nice.
I noticed you changed your mind about using snake guides.
|
|
|
|
Post by kilgortrout on Mar 22, 2012 9:43:19 GMT -6
Bruce, yes, good eye. This rod is for a exchange with a fellow FFer in Vancouver. When I looked back at our original agreement, it took me a while to make this thing, the agreement was for snakes, so I put them on. I had the single foot guides all lined up but thought that would not be nice to the person who would ultimately fish the rod, despite my preferences for the single foot. I did however add on extra guides despite the snakes, and tried to use the lightest smallest snakes.
I will receive in exchange a rod that he has made for me.
Maybe some forum members here would like to do the same and have a graphite rod exchange.
Cheers Ron.
|
|